Welcome to the 3rd email in the email training series for HourADay.
This email will take you 4 minutes and 15 seconds to read and take action on.
This is one of HourADay’s most powerful functions as it allows you to automate and semi-automate your follow-up.
You have previously and successfully learned how to Edit your Initial Emails and Add Contacts into your system. The next step is to Create an Email Series. Remember to think like the people you are sending these messages to as you craft your emails.
You can create a Regular Series, Social Series, or Twitter Series.
- A Regular email series is fully automated, and you can add contacts to the series manually, or trigger them to be added from a survey page, or business card scan and transcription.
- The Social Series allows you to semi-automatically communicate with your clients via Facebook, Skype, Whatsapp, Instagram, etc. YOu make the basic message as a series, and you have the ability to customize it on the fly as you begin to send it.
- The Twitter Series specifically allows you to work with twitter to curate a very specific number of lists and communicate semi automatically by direct message with your curated followers.
Here are the exact steps to make this happen on your computer, a mobile browser, and through the mobile App.
Via Computer Web Browser
From your computer, use HourADay on a web browser to create your email series by following the simple steps below. We are assuming you have already logged into www.houraday.com by using your username and password.
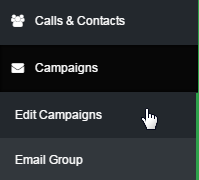
Step 1: Click on Campaigns on the left hand menu to expand the section and then click on Edit Campaigns.
Step 2: In the Email Campaigns section, enter the series details in the first row and then click on the Add button.
- Campaign Name: The name of the email series as it will be displayed in the Email Campaigns list.
- Delay: How long (in days) after you add and/or subscribe a contact to this series the first email will be sent out.
- Campaign Type: Select a email series template type from drop-down menu. See above explanation to get an idea.
- Language: Select a language from the drop-down menu for which the email series will be made available in the system.
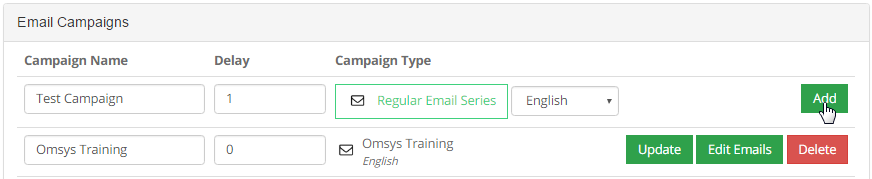
Step 3: The new series you have just added will show up in the Email Campaigns section. Click on the corresponding Edit Emails button to go to the page where you can create/add an email to this new series.

Step 4: Click on the Add button to start creating emails and adding them into the list of this new series.
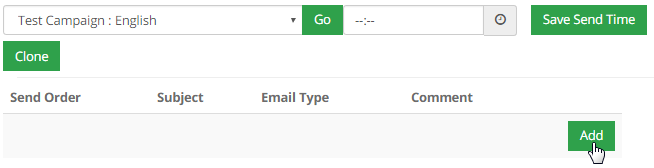
Step 5: A floating window should pop up where you can add content to your email as follows;
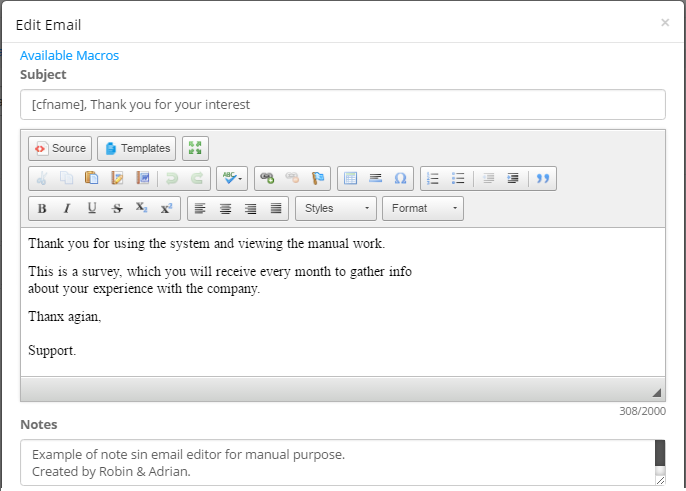
- Click the Available Macros link to see what kind of information you have available to embed into your email to keep it personal.
- Write a Subject and a body for your email; remember MACROS are the things between the square brackets and will pull in live content data.
- Add a Note to the content of the email which would act as a future reference.
- Add in the Number of Days you want to pass by before your next email will go out in the Delay to next email in days field.
- Give this email a number for ease of tracking and re-ordering capability later. We suggest going by 10’s, starting with 100 as your first number.
- Once done. click on the Submit button below to save the email template.
Repeat Step 5 to add more emails into the series as much as desired. Be Careful with the ordering of the emails, as it is how the emails are sent out sequentially in the specified time period (delay). You can modify these emails later as and when required from the Current Series section.
Via Mobile Web Browser
If you are using a Mobile device that supports basic internet, you can get to the HourADay system through its browser. Assuming that you have logged into the system via your mobile browser, you can add a new series or add an email to an existing series by following these simple steps;
Step 1: On the home page, click on the menu at the top right corner to expand the list.
Step 2: Click on the Campaign link to expand the list. Then click on the Edit Campaigns submenu.
Step 3: Scroll down to the Email Campaigns section, enter the series details in the first row and then click on the Add button. For a description of the attributes, see above.
Step 4: The new series you have just added will show up in the Email Campaigns section. Click on the corresponding Edit Emails button to go to the page where you can create/add an email to this new series.
Step 5: Click on the Add button to start creating emails and adding them into the list of this new series.
Step 6: A floating window should pop up where you can add content to your email as follows;
- Click the Available Macros link to check the macro listing.
- Type in a Subject and the email content in the body of your email.
- Add a Note to the content of the email for future reference.
- Set the Delay to the next email in days.
- Type in the Email# to set the order of the email in the list.
- Once done, click on the Submit button below to save the email template.
Repeat Steps 5-6 to add more emails into the series as much as desired. Be Careful with the ordering of the emails, as it is how the emails are sent out sequentially in the specified time period (delay). You can modify these emails later as and when required from the Current Series section.
Via Mobile App
If you have the HourADay APP in your Smart Mobile device, you can also use the editing email series feature through it. Assuming that you have logged into the system via your mobile application; you can add a new series or add an email to an existing series by following these easy steps;
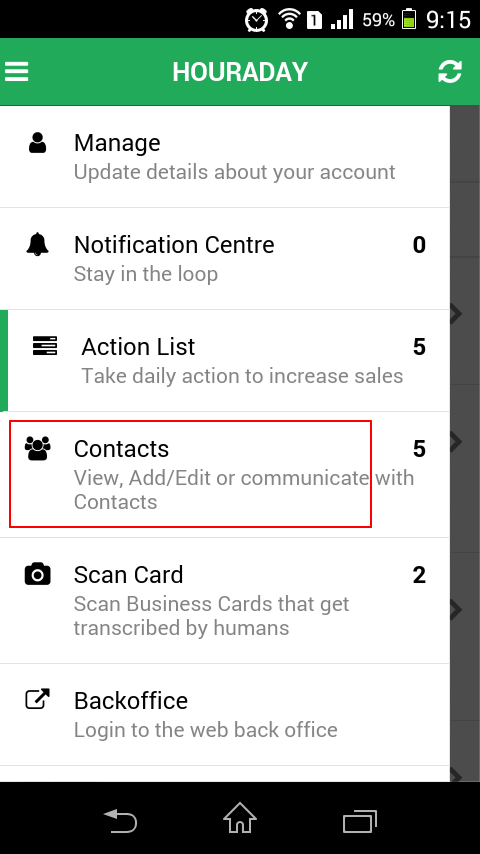
Step 1: On the home page, click on the menu at the top left corner to expand the list.
Step 2: From the menu list, click on Contacts to get the full contact list.
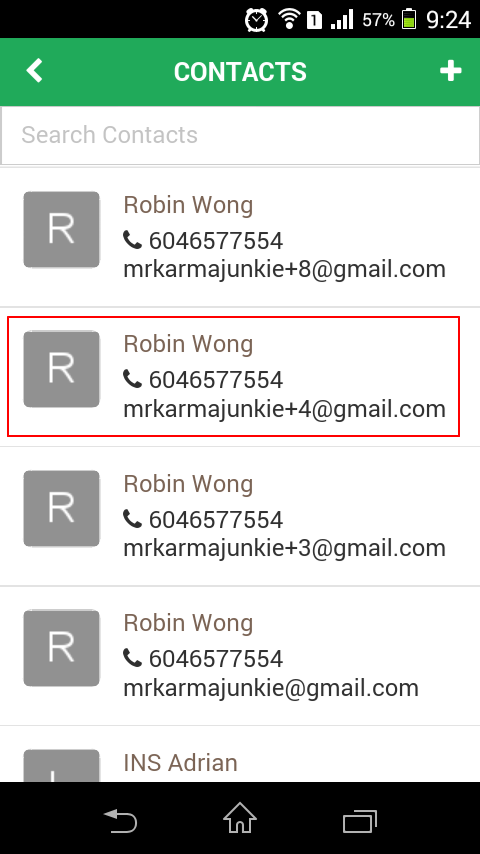
Step 3: From the contact list, click on the contact where you want to add/edit the email content.
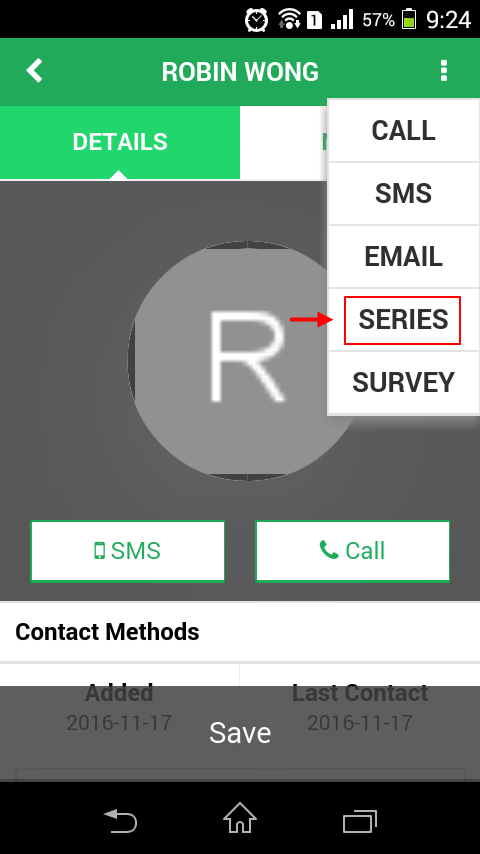
Step 4: On the contact page, click on the menu at the top right corner (3 vertical dots); in the small dropdown box area, click Series.
Step 5: Scroll down a little bit until u see Create/Edit Campaigns. Click on that button.
Step 6: Scroll down to the Email Campaigns section, enter the series details in the first row and then click on the Add button. For a description of the attributes, see above.
Step 7: The new series you have just added will show up in the Email Campaigns section. Click on the corresponding Edit Emails button to go to the page where you can create/add an email to this new series.
Step 8: Click on the Add button to start creating emails and adding them into the list of this new series.
Step 9: A floating window should pop up where you can add the content to your email as follows;
- Click the Available Macros link to check the macro listing.
- Type in a Subject and the email content in the body of your email.
- Add a Note to the content of the email for future reference.
- Set the Delay to the next email in days.
- Type in the Email# to set the order of the email in the list.
- Once done, click on the Submit button below to save the email template.
Repeat Steps 8-9 to add more emails into the series as much as desired. Be Careful with the ordering of the emails, as it is how the emails are sent out sequentially in the specified time period (delay). You can modify these emails later as and when required from the Current Series section.
Until our Next Lesson on How to Edit your Email Series!
Happy Dreaming.
Yours Truly,
HourADay.com Support and Training Crew
Skype: ins-support
PS: If you want to jump ahead and learn more, you can see the entire training series by clicking here: Tutorial